2010年12月27日 星期一

Pietty中文變亂碼解決方式


使用Pietty透過ssh方式連線Linux系統,中文字變亂碼,該如何解決?
解決方式:
1.功能表選項\字元編碼
2.勾選Unicode UTF-8
3.功能表選項\亞洲語系修正
4.取消勾選Unicode 亞洲寬符號字元

2010年12月22日 星期三

Using the Flash ‘Nested Ojects’ method in ASP pages

資料來源:http://seanys.com/2007/09/10/asp-flash-nested-objects/


Using the Flash ‘Nested Ojects’ method in ASP pages

Occasionally I want to use Flash on a web page. Tragic, but true. I’ve been looking for an accessible, valid method for doing this. There are few candidates. I settled on the ‘Nested Objects’ method. It seemed quick, painless and didn’t require javascript. But there was a hitch…
Active Server Pages error 'ASP 0139'
Nested Object
An object tag cannot be placed inside another object tag.  
IIS’s ASP interpreter wouldn’t pass the page with nested <object> tags.
Of course, nothing is ever simple. I’ve configured IIS to serve .htm and .html files as ASP so every page on my site is an ASP page. This may be an odd thing to do but it seemed easier than renaming every page, ~2000 at that time, and creating appropriate redirects. I also couldn’t easily edit out the snippets of ASP from any given page as the entire site heavily relies on DreamWeaver templates and the ASP is not in editable regions.
I needed a simple solution and this is it… use a server-side include.
Put the non-IE <object>… </object> and IE conditional comments section in the include file.
<!--[if !IE]> <-->
      <object data="movie.swf" width="320" height="240"
              type="application/x-shockwave-flash">
        <param name="salign" value="lt" />
        <param name="quality" value="high" />
        <param name="scale" value="noscale" />
        <param name="bgcolor" value="#FFFFFF" />
        <param name="pluginurl"
               value="http://www.macromedia.com/go/getflashplayer" />
        </object>
    <!--> <![endif]-->
 
Put the include reference where the displaced code should go.
      <!--#include file="flash.txt"-->
Job done.

其他參考資料:

SWFObject FAQ:http://code.google.com/p/swfobject/wiki/faq
Object Paranoia:http://juicystudio.com/article/object-paranoia.php

2010年12月21日 星期二

如何把windows 2008重新佈署(Sysprep)

資料來源:http://www.dotblogs.com.tw/dotjason/archive/2009/09/29/10823.aspx


今天Jason於客戶端協助排除問題時,因客戶欲把備份的image檔倒回去到設備中,但必須將SID重新取得
Jason置入了Win 2008光碟就是遍尋不著sysprep工具,此時直接進到系統中,找到這個工具就預載到作業系統中了
其路徑如下:c:\windows\system32\sysprep\sysprep.exe
執行後畫面如下:

此時,系統清理動作選擇「進入系統全新體驗(OOBE)」
關機選項則依照個人意願即可,記得…要勾核一般化,如此一來按下確定隨即完成sysprep

2010年12月15日 星期三

bat 批次檔指令

資料來源:http://www.nwself.com/2008/08/bat.html

bat 批次檔指令

重設被病毒感染的系統檔案和資料夾隱藏屬性

資料來源:http://www.590103.idv.tw/blog/archives/581

重設被病毒感染的系統檔案和資料夾隱藏屬性

不同的電腦病毒會造成你的電腦上不同類型的損壞。大多數的電腦病毒會禁止使用者:關閉工作管理員、Regedit、命令提示字元和資料夾選項等。而這些限制就是為了防止使用者使用這些內建的Windows診斷工具進而刪除該病毒。

有一些病毒會將最近使用的檔案破壞及將檔案加密,讓使用者迫於無奈非得購買解密的金鑰。也有一種病毒例如BDS.Mirc.Backdoor,會將你的檔案隱藏起來。如果你曾經設定『顯示所有檔案和資料夾』以及打開『隱藏保護作業系統檔案』,還是可以看到那些檔案的。那些病毒會限制你設定這些選項,讓你以為你的檔案已經被病毒刪除,事實上它隱藏在你的系統之中。
virus-hidden-file.jpg
有時候你希望因為病毒而不見的檔案可以重見天日,我們在這裡告訴你,如果檔案還存在的話,你可以利用資料夾選項重新設定檔案的屬性。
以下是如何查看隱藏檔案和資料夾夾或系統檔案。
1.進入『控制台』,打開『資料夾選項』。
2.選擇『檢視』頁,選取『顯示所有檔案和資料夾』,取消『隱藏保護作業系統檔案』。請注意,有些電腦病毒會自動恢復你的設定,所以要確保你的電腦不會病毒騷擾,先用防毒軟體掃毒一下。
show-hidden-files-folders.jpg
3.嘗試尋找你遺失的檔案,有個叫做RSIT的工具軟體可幫你找到過去1到3個月內曾經建立或修改的檔案及資料夾。
4.如果你找到你被隱藏的的檔案,因為你已經在資料夾選項中顯示被隱藏的檔案,所以你要將那些被隱藏的檔案取消隱藏屬性。下列三種方法告訴你如何重新設定系統和隱藏的屬性。

attrib 命令

dos-attrib-command.jpg
這是不需要使用任何軟體的一種老做法,你在要在命令提示字元內(開始→執行→CMD),輸入命令『attrib -H -S C:\path\to\your\file.doc』。你也可以使用星號定義多種副檔名。例如『attrib -H -S C:\590103\*.*』這樣會消除在C磁碟中590103的資料夾內所有檔案的系統和隱藏屬性。

iReset

ireset-unhide-hidden-files.jpg
這是一個可攜式重新設定檔案和資料夾的系統或隱藏屬性,讓你可以查看或正常存取。你只要將檔案拖到介面中的十字圖案內即可,然後按一下RESET按鈕。這個工具是免費的,如果要用在商業用途,必須先取得授權許可。

Attribute Changer

change-file-folder-attribute.jpg
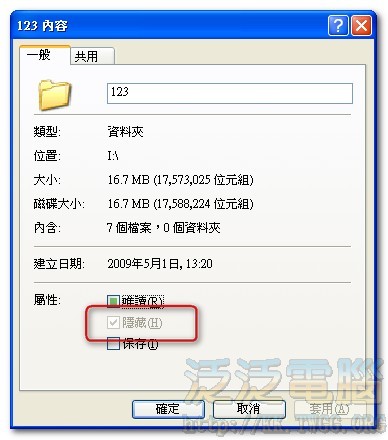
如果檔案有隱藏屬性,你可以在檔案上按右鍵→內容→將隱藏打勾取消,就可以很輕鬆的移除設定。但是如果檔案有系統屬性,而隱藏打勾框又是灰色的情況下,你就無法變更。Attribute Changer,你可以利用這套軟體一次解決檔案或資料夾屬性的設定。
以上三種方法都可以協助你重新設定你的檔案和資料夾的屬性,不過笨笨包一般都使用attrib命令設定,因為簡單又好用。但是如果你無法使用命令提示字元的話,還可以用iReset或Attribute Changer使用呢!

MCSA & MCSE2003 證照升級 MCITP (科目簡表)

資料來源:http://www.im.tv/blog/article.asp?memid=253210&artid=1049800


MCSA on Windows Server 2003 to Windows Server 2008:
MCSA 2003+70-648


MCSE on Windows Server 2003 to Windows Server 2008:
MCSE 2003+70-649


MCSA  on Windows Server 2003 to MCITP (Server Administrator ):
MCSA 2003+70-648+70-646


MCSA  on Windows Server 2003 to MCITP (Enterprise Administrator ):
MCSA 2003+70-648+70-643+70-620(or 624)+70-647


MCSE on Windows Server 2003 to MCITP (Server Administrator ):
MCSE 2003+70-649+70-646


MCSE on Windows Server 2003 to MCITP (Enterprise Administrator ):
MCSE 2003+70-649+70-620(or 624)+70-647

2010年12月14日 星期二

[解毒DIY] 病毒已清除,無法更改資料夾的隱藏屬性

資料來源:http://hope11188.pixnet.net/blog/post/28497875

病毒已清除,無法更改資料夾的隱藏屬性

症狀:在電腦裡顯示所有檔案,發現原來的檔案夾都被隱藏了(其實是把檔案夾的屬性改為隱藏、系統屬性),替換成病毒自建的同名檔案,而且隱藏屬性無法修改。

檔案夾隱藏無法修改屬性 01
    

顯示所有隱藏檔案」和「顯示系統檔案
1、開始-->執行,輸入regedit,運行註冊表編輯器,找到HKEY_LOCAL_MACHINE\Software\Microsoft\windows\
CurrentVersion\explorer\Advanced\Folder\Hidden\SHOWALL,
刪除CheckedValue,單擊右鍵新建——Dword值——命名為CheckedValue,然後修改它的數值資料為1,這樣就可以選擇「顯示所有隱藏檔案」和「顯示系統檔案」。


【刪除中毒檔案,或安裝防毒小紅傘、江民防毒】
2、看在檔案夾選項中將隱藏已知檔案類型的副檔名前的勾去掉,然後刪除所有硬碟中的未被隱藏的.exe檔案(原來硬碟裡有的檔案夾是重名的而且原有的檔案夾是隱藏屬性)


【修復資料夾隱藏選項】
3、將所有檔案夾的原來屬性恢復。

恢復方法:
開始-->執行。輸入CMD。

然後輸入     attrib -r -s -h x:\myfile    
X為硬碟(X槽),myfile為檔案夾的名字(只對英文檔名有效,如是中文檔名,請先隨便改成英文,修改完後在改回中文),如果遇到檔案夾名字中有空格的,比如檔案夾名為my file。則輸入attrib -h -s    X:\my file,如此將所有檔案夾恢復即可。
檔案夾隱藏無法修改屬性 02

4、把整個硬碟的資料都一次性顯示出來方法:attrib -r -s -h D:\*.* /s

(註:D為硬碟)(這個我沒成功過....=.=)
【資料夾隱藏選項修復】
檔案夾隱藏無法修改屬性 03

2010年12月9日 星期四

用IE開Flash不想跑出黃色的警告資訊列

資料來源:http://fanchie.blogspot.com/2008/05/blog-post_25.html

 如果你有使用 javascript ,又在本機上看網頁,在 IE 上就會顯示一條黃色的寫『為了協助保護您的資訊安全性,Interner Explorer已限制這個網頁執行指令檔或可以存取您電腦的ActiveX控制項』

  我想你要是在寫網頁看到這行,會很討厭吧,每次都要按一下,再按確定,真的很煩人耶,我想每個人應該也都知道這是 IE 的安全性問題,自己去改改 IE 設定也行,但是也不可以叫使用者去修改 IE 的安全設定吧!


如果您的網頁需要執行 Active X 或指令檔處理,您可以在 HTML 程式碼中加入網頁的註解標記。 這個 Internet Explorer 功能可讓 HTML 檔案強制進入本機電腦區域以外的區域,如此一來,這些檔案便會根據套用到註解所識別之 URL 的安全性範本,執行指令檔或 ActiveX 程式碼。例如,如果所指定的 URL 是 www.contoso.com,且該 URL 在信任的網站清單中,則網頁會使用信任的網站區域的安全性範本。此設定適用於 Internet Explorer 4 及更新版本。若要將網頁的註解標記插入 HTML 檔案,請新增下列其中一個註解:

<!-- saved from url=(0022)http://www.example.com -->

請在已識別網域的網頁中插入網頁標記時使用此註解,以主控網頁之網際網路或內部網路網域的 URL 來取代 http://www.example.com。請在 URL 之前加上用括弧括住的 URL 長度,以作為網頁標記,例如 (0022)。

如果要將網頁永遠當作網際網路區域的一部分,可以使用下列網頁標記:

<!-- saved from url=(0014)about:internet -->

當您需要插入一般的網頁標記時,請使用這個註解。about:internet 部份會在網際網路區域中放置頁面。


參考資料來源:- http://technet2.microsoft.com/
- http://www.adobe.com/tw/support/dreamweaver/
http://www.adobe.com/tw/support/flashplayer/ts/documents/sp2_local.htm

2010年12月7日 星期二

ASP防止盜鏈或防止下載的方法

資料來源:http://xiong.blog.51cto.com/811/17586

我們在管理網站文件時,可以把擴展名一樣的文件放在同一個目錄下,起一個比較特別名字,例如放pdf文件目錄為the_pdf_file_s,把下面代碼另存為down.asp,他的網上路徑為 [url]http://www.xx.com/down.asp[/url],我們就可以用[url]http://www.xx.com /down.asp?FileName=51windows.pdf[/url]來下載這個文件了,而且下載者無法看到這個文件實際下載路徑的!在 down.asp中我們還可以設置下載文件是否需要登陸,判斷下載的來源頁是否為外部網站,從而可以做到防止文件被盜鏈。
 
      示例代碼:
以下是引用片段:
以下是引用片段:
  <% 
  From_url = Cstr(Request.ServerVariables("HTTP_REFERER")) 
  Serv_url = Cstr(Request.ServerVariables("SERVER_NAME")) 
  if mid(From_url,8,len(Serv_url)) <> Serv_url then 
  response.write "非法鏈接!" '防止盜鏈 
  response.end 
  end if 
   
  if Request.Cookies("Logined")="" then 
  response.redirect "/login.asp" '需要登陸! 
  end if 
  Function GetFileName(longname)'/folder1/folder2/file.asp=>file.asp 
  while instr(longname,"/") 
  longname = right(longname,len(longname)-1) 
  wend 
  GetFileName = longname 
  End Function 
  Dim Stream 
  Dim Contents 
  Dim FileName 
  Dim TrueFileName 
  Dim FileExt 
  Const adTypeBinary = 1 
  FileName = Request.QueryString("FileName") 
  if FileName = "" Then 
   Response.Write "無效文件名!" 
   Response.End 
  End if 
  FileExt = Mid(FileName, InStrRev(FileName, ".") + 1) 
  Select Case UCase(FileExt) 
   Case "ASP", "ASA", "ASPX", "ASAX", "MDB" 
   Response.Write "非法操作!" 
   Response.End 
  End Select 
  Response.Clear 
  if lcase(right(FileName,3))="gif" or lcase(right(FileName,3))="jpg" or lcase(right(FileName,3))="png" then 
  Response.ContentType = "image/*" '對圖像文件不出現下載對話框 
  else 
  Response.ContentType = "application/ms-download" 
  end if 
  Response.AddHeader "content-disposition", "attachment; filename=" & GetFileName(Request.QueryString("FileName")) 
  Set Stream = server.CreateObject("ADODB.Stream") 
  Stream.Type = adTypeBinary 
  Stream.Open 
  if lcase(right(FileName,3))="pdf" then '設置pdf類型文件目錄 
  TrueFileName = "/the_pdf_file_s/"&FileName 
  end if 
  if lcase(right(FileName,3))="doc" then '設置DOC類型文件目錄 
  TrueFileName = "/my_D_O_C_file/"&FileName 
  end if 
  if lcase(right(FileName,3))="gif" or lcase(right(FileName,3))="jpg" or lcase(right(FileName,3))="png" then 
  TrueFileName = "/all_images_/"&FileName '設置圖像文件目錄 
  end if 
  Stream.LoadFromFile Server.MapPath(TrueFileName) 
  While Not Stream.EOS 
   Response.BinaryWrite Stream.Read(1024 * 64) 
  Wend 
  Stream.Close 
  Set Stream = Nothing 
  Response.Flush 
  Response.End 
  %> 
本地圖片,音樂等ASP防盜鏈代碼(asp)

     
        以下是引用片段:
以下是引用片段:
<% 
  '定義函數,用ADODB.Stream讀取二進制數據 
  Function ReadBinaryFile(FileName) 
   Const adTypeBinary = 1 
   Dim BinaryStream 
   Set BinaryStream = CreateObject("ADODB.Stream") 
   BinaryStream.Type = adTypeBinary 
   BinaryStream.Open 
   BinaryStream.LoadFromFile FileName 
   ReadBinaryFile = BinaryStream.Read 
  End Function 
   
  Response.AddHeader "Content-Disposition", "attachment;filename=2.gif"'文件名 
  Response.ContentType = "image/GIF" 』設置(1) 
  response.Binarywrite ReadBinaryFile(server.mappath("2.gif"))'就是你讀取存在本地的文件,防止被
別人知道真實路徑盜連的。 
   
  %>

 (1)下面的示例將 ContentType 屬性設置為其他的常見值。
  text/HTML 這個就不說了
  image/GIF gif圖片
  image/JPEG jpg圖片
  application/x-cdf cdf文檔
  application/wma 就是西瓜哪個音樂類型了
  具體可以參照 Web 瀏覽器文檔或當前的 HTTP 規格說明
 
  這樣再利用asp的儲存session,cookies,以及讀取HTTP頭等特殊功能就可以完全真正的實現防盜連,這裡
沒有設置緩存,如果訪問量巨大,我想設置下就會更好吧。

asp下載防盜鏈代碼
第一種:
終於對下載系統做了個防盜鏈措施,在下載的頁面頭部做了如下代碼,相關代碼如下:
以下是引用片段:
以下是引用片段:
<% 
From_url = Cstr(Request.ServerVariables("HTTP_REFERER")) 
Serv_url = Cstr(Request.ServerVariables("SERVER_NAME")) 
if mid(From_url,8,len(Serv_url)) <> Serv_url and mid(From_url,8,len(Serv_url))<>"ITstudy.cn" and mid(From_url,8,len(Serv_url))<>"http://www.gc888.cn/" then 
response.write "您下載的軟件來自IT學習網,請直接從主頁下載,謝謝<br>" 』防止盜鏈 
response.write "<a href=http://www.gc888.cn>IT學習網[url]http://www.gc888.cn</a>[/url]" 』防止盜鏈 
response.end 
end if 
%> 
第二種:
以下是引用片段:
以下是引用片段:
<%  
  』定義函數,用ADODB.Stream讀取二進制數據  
  Function ReadBinaryFile(FileName)  
   Const adTypeBinary = 1  
   Dim BinaryStream  
   Set BinaryStream = CreateObject("ADODB.Stream")  
   BinaryStream.Type = adTypeBinary  
   BinaryStream.Open  
   BinaryStream.LoadFromFile FileName  
   ReadBinaryFile = BinaryStream.Read  
  End Function  
    
  Response.AddHeader "Content-Disposition", "attachment;filename=2.gif"』文件名  
  Response.ContentType = "image/GIF" 』設置(1)  
  response.Binarywrite ReadBinaryFile(server.mappath("2.gif"))』就是你讀取存在本地的文件,防止被 
別人知道真實路徑盜連的。  
    
  %>
  下面的示例將 ContentType 屬性設置為其他的常見值。

 text/HTML 這個就不說了
  image/GIF gif圖片
  image/JPEG jpg圖片
  application/x-cdf cdf文檔
  application/wma 就是西瓜哪個音樂類型了
  具體可以參照 Web 瀏覽器文檔或當前的 HTTP 規格說明
  
  這樣再利用asp的儲存session,cookies,以及讀取HTTP頭等特殊功能就可以完全真正的實現防盜連,這裡
沒有設置緩存,如果訪問量巨大,我想設置下就會更好吧。

第三種:
最簡單的用Active Server Pages防站外提交表單、跨站提交表單、防盜鏈……
方法:Request.SeverVariables("HTTP_REFERER")
解釋:當某人通過鏈接到達當前頁,HTTP_REFERER 就保存了這個用戶的來源(來路)
舉個例子,這個例子很簡單,只是拋磚引玉而已,大家可以增加更多的功能。
如下,只有首先從「 [url]http://www.gc888.cn[/url]」登陸才能看到文件內容。
源碼:index.asp
以下是引用片段:
以下是引用片段:
<html> 
<head><title>最簡單的用asp防盜鏈</title></head> 
<body> 
<% 
Option.Explicit 
Response.Buffer=Ture 
%> 
<% 
CheckUrl([url]http://www.gc888.cn[/url]) 
%> 
<% 
Function CheckUrl(url) 
 Dim Where:Where=Request.SeverVariables("HTTP_REFERER") 
 If Where=url Then 
  Call main() 
 Else 
  Response.write("很抱歉,您必須從"&url&"訪問才能進來!") 
 End if 
End Function 
%> 
<% 
Sub main() 
 Response.write("這兒是你要顯示的網頁內容") 
End sub 
%> 
</body> 
</html>

該方法對防止盜鏈文章、站外提交表單、跨站提交表單還比較有效,對於軟件盜鏈比如.rar.zip.exe等倒沒什麼作用。
不知各位讀者是否有好的主意,呵呵。
還有一種方法就是用判斷服務器及上一頁的地址來完成。
以下是引用片段:
以下是引用片段:
<% 
dim from, local 
from = request.ServerVariables("HTTP_REFERER") 
local = request.ServerVariables("SERVER_NAME") 
If mid(from, 8, local)<>Len(local) Then 
  response.write "不要從外部提交數據" 
else 
  call main() 
end if 
sub main() 
』你的主體內容 
end sub 
%> 

2010年12月4日 星期六

安裝 SQL Server 2008 Express with Tools ,提示【SQL Server 2005 Express Tools 需先移除】

資料來源:http://blog.miniasp.com/post/2008/08/Microsoft-SQL-Server-2008-Express-with-Tools-and-Advanced-Services-Released.aspx

安裝 SQL Server 2008 Express with Tools 的時候,有發現到安裝之前的檢查項目中還會提示【SQL Server 2005 Express Tools 需先移除】,你只要從控制台中的【新增或移除程式】將 Microsoft SQL Server Management Studio Express 移除即可。

SQL Server® 2008 R2 Express 版下載點

資料來源:http://alexchuo.blogspot.com/2010/07/sql-server-2008-r2-express.html

SQL Server® 2008 R2 Express 版下載點

隨著 SQL Server® 2008 R2 RTM 發行,SQL Server® 2008 R2 Express 版也問世了,茲將相關下載點整理如下:
附註

2010年12月3日 星期五

windows 7 存取 samba

資料來源:http://blog.the.tw/2009/12/windows-7-samba.html

windows 7 存取 samba

有些使用較舊版samba架設的檔案分享功能,windows 7 (win7) 也許無法存取,
一直跳出要你輸入帳號密碼,即使輸入正確還是相同的結果。
因為驗證機制不相容才會有此種情形發生,那要如何解決呢?
以下教法只針對client端的作業系統去做修改:
1.家用進階版 以下 ( Home Premium , Home Basic , Starter )
修改regedit
在 [HKEY_LOCAL_MACHINE\SYSTEM\CurrentControlSet\Control\Lsa] 下
新增 LmCompatibilityLevel 值1
擷取
註: LmCompatibilityLevel 數字的意義
0=Send LM & NTLM responses  (never uses NTLMv2)
1=Send LM & NTLM - use NTLMv2 session security if negotiated
2=Send NTLM response only, use NTLMv2 if server supports it.
3=Send NTLMv2 response only, if DC accept LM, NTLM and NTLMv2 auth, use NTLMv2 security if supported.
4=Send NTLMv2 response only, if DC refuse LM, accept NTLM or NTLMv2 auth, use NTLMv2 security if supported.
5=Send NTLMv2 response only, if DC,refuse LM & NTLM and only accept NTLMv2 auth, use NTLMv2 security if supported.
2.專業版 以上 ( Professional , Enterprise , Ultimate )
開啟命令提示列,執行secpol.msc (安全性設定主控台)
image
Security Settings –> Local Policies –> Security Options  
修改 Network security: LAN Manager authentication level 這Policy的設定
image

選擇此值:Send LM & NTLM - use NTLMv2 session security if negotiated。
按OK後,再試試是否可以存取samba分享的目錄
image
image

Send LM & NTLM - use NTLMv2 session security if negotiated: Clients use LM and NTLM authentication and use NTLMv2 session security if the server supports it; domain controllers accept LM, NTLM, and NTLMv2 authentication.

2010年12月2日 星期四

使用SQL 2008 SSMS變更資料表出現"防止儲存需要資料表重建的變更"

資料來源:http://huwk.blogspot.com/2010/07/sql-2008-ssms.html

解決方法:SSMS 工具->選項->左邊選單 Designers,裡面把”防止儲存需要資料表重建的變更”,取消掉即可

資料庫物件命名原則

資料來源:http://renjin.blogspot.com/2008/02/database-naming-conventions.html

程式設計使用命名慣例及有意義的名稱,會讓程式容易閱讀,而資料庫設計也應該如此。如果你希望自己的系統具可維護性(Maintainability),你就不應該草率的命名你的資料庫物件。採用命名原則的目的,是為了能夠讓資料庫物件名稱擁有足夠資訊,讓自己或是其他開發成員能清楚知道物件的類型及其使用目的。

本文將針對以下資料庫物件來說明:
  1. 資料表(Tables)
  2. 資料欄位(Columns)
  3. 檢視表(Views)
  4. 預儲程序(Stored Procedures)
  5. 觸發程序(Triggers)

所有的資料庫物件命名都應該遵循以下規則:
  1. 若未超過長度,限制應避免使用縮寫。
  2. 使用 Pascal 大小寫命名法,前綴詞則使用 Camel 命名法。
  3. 使用英文字母或底線字元組合,數字應盡量避免。
  4. 不要以底線字元當字首

若因長度的限制而需要使用縮寫時,應遵從以下的規則:
  1. 縮寫的第一個字元應該與單詞的第一個字母相同。
  2. 兩個字母的縮略字使用全大寫字母,而三個以上之字元的縮略字則使用 Pascal 大小寫慣例。遵守命名慣例的範例:ID、DB、Sql。違反命名慣例的範例:Id、Db、SQL。
  3. 不要使用任何不被廣泛接受的縮略字。

資料表(Tables)
資料表應該使用複數名稱,例如:Employees。若名稱由多個單詞組成,則只有最後一個單詞使用複數,例如:UserRoles。

如果資料表是屬於多對多關聯性(Many-To-Many Relationship)的聯合資料表(Junction Table),也就是該資料表的主索引鍵是由由資料表 A 和資料表 B 兩者的外部索引鍵所組成,就要連結資料表 A 和資料表 B 的名稱來命名。例如,Authors 資料表和 Titles 資料表之間具有多對多關聯性,而你需要一個資料表來維持這兩個資料表彼此之間的多關聯性,則這個資料表就應該命名為 TitlesAuthors。

資料欄位(Columns)
因為資料欄位是資料表的成員,所以欄位名稱不應再列入冗餘的資料表名稱。

檢視表(Views)
檢視表應比照資料表命名規則,但為有別於資料表,應加入前綴詞以避免混淆,例如:vw_Users。

預儲程序(Stored Procedures)
{Table Name}_{Action}[Qualifier]
  • Table Name:預儲程序主要作用的資料表名稱。如果沒有作用在資料表上,就使用 Util(Utility的簡寫)來命名。
  • Action:這部份指的是作用到資料表的主要動作,例如:Create、Get、Update、Delete。如果是 Util 程序,這個部份就不一定要加上。
  • Qualifier:可以選擇性用來更清楚描述這個預儲程序要進行的動作。

觸發程序(Triggers)
{Prefix}_{Table Name}_{Actions Covered}
  • Prefix:使用 trg_ 做為前綴詞,以別於其他資料庫物件。
  • Table Name:執行觸發程序所在的資料表名稱。
  • Actions Covered: 啟動觸發程序的 Insert、Update、Delete 選項。在此用 "Ins"、"Upd"、"Del" 來描述。
其他參考[問題回答]資料庫物件命名原則?
其他參考【教學】 資料庫&資料表欄位命名規則

2010年12月1日 星期三

在 WINDOWS SERVER 2008 下以 CDO.Message 寄送 E-MAIL 會遇到的狀況

資料來源:http://vfp.sunyear.com.tw/viewtopic.php?p=19354
在 WINDOWS SERVER 2003 以下用 CDO.Message 寄送 E-MAIL 都正常,但 WINDOWS SERVER 2008 (可能也包括 VISTA) 就問題可多了

1.WINDOWS SERVER 2008 似乎沒有 SMPT Service,但有 SMPT 伺服器,它不是預設安裝的選項,所以要先手動安裝後重啟電腦。

2.在 WINDOWS SERVER 2008 下,以 Send 方法程序傳送郵件時,可能會出現下列錯誤:
1. OLE IDISPATCH EXCEPTION CODE 0 FROM CDO.MESSAGE.1: "SENDUSING" (傳送使用) 設定值無效。
2. 雖然 Send 方法程序執行正常,但郵件寄不出去。


所以,在 WINDOWS SERVER 2008 之前,以下列方式宣告 CDO.Message 後就可以了

M_oMessage = CreateObject("CDO.Message")

但現在要這麼做

M_oCDOConf = Createobject("CDO.Configuration")
WITH M_oCDOConf.Fields
.Item("http://schemas.microsoft.com/cdo/configuration/sendusing").Value = 2
IF ISNULL(.Item("http://schemas.microsoft.com/cdo/configuration/smtpserver").Value)
* 指定合法的郵件伺服器名稱 (自行指定),我想 Hinet 應該不會隨便就倒吧
.Item("http://schemas.microsoft.com/cdo/configuration/smtpserver").Value = "msa.hinet.net"
ENDIF
.Update
ENDWITH
M_oMessage = CreateObject("CDO.Message")
M_oMessage.Configuration = M_oCDOConf


等到 CDO.Message 使用完畢要釋放時,執行如下

STORE .NULL. TO M_oMessage, M_oCDOConf
RELEASE M_oMessage, M_oCDOConf

2010年11月30日 星期二

使用 SMTP 來傳送外送訊息

資料來源:http://www.microsoft.com/taiwan/technet/itsolutions/ecommerce/deploy/d5smtp.aspx?mfr=true


SMTP 如何運作?

Simple Mail Transfer Protocol 是一種重要的 Internet 通訊協定 (IP),可以有效而穩定的傳送電子郵件。
SMTP 背後的點子相當簡單,使用者或應用程式 (此處是指 Duwamish Online) 撰寫一份訊息,其中除了訊息主旨和內容之外,還附上收件人的電子郵件地址 (例如,"johndoe@somecompany.com")。
接著將訊息傳送給指定的 SMTP 伺服器。SMTP 伺服器會根據收件人電子郵件地址的網域名稱 (例如,"somecompany.com"),與網域名稱系統 (DNS) 伺服器通信,後者則針對該網域,查閱並傳回目的 SMTP 伺服器的主機名稱 (例如,"mail.somecompany.com")。
最後,起始的 SMTP 伺服器再透過 Transmission Control Protocol/Internet Protocol (TCP/IP) 連接埠 25,直接與目的 SMTP 伺服器通信。如果收件人電子郵件地址的使用者名稱,與目的伺服器中的一個授權使用者帳戶相符,原始電子郵件訊息就會傳送到該伺服器,並等候收件人透過用戶端程式來收取訊息。
如果起始 SMTP 伺服器無法直接與目的伺服器通信,SMTP 通訊協定也會提供機制,透過一個以上的中繼轉接 SMTP 伺服器來傳送訊息。轉接伺服器在收到原始訊息後,會將它傳送給目的伺服器,或是重新導向給另一個轉接伺服器。這個程序會一直反覆執行,直到訊息傳送出去,或是超過指定的等候時間為止。

以 CDO 加以測試

另一個驗證 SMTP 服務的方法,就是用 Collaboration Data Objects (CDO) for Windows 2000 撰寫簡單的 Microsoft Visual Basic® Scripting Edition (VBScript) 指令檔。
CDO for Windows 2000 (又稱為 CDO 2.0 或 Cdosys.dll) 是一種合作元件的套件,主要是用來簡化 Internet 訊息的建立或操作。開發人員可以使用 CDO,透過 SMTP 通訊協定和本機Pickup 目錄來收送訊息,而不必自已撰寫程式碼來進行 SMTP 通信。其他詳細資訊,請參閱有關 CDO for Windows 2000 的文章,網址為 http://msdn.microsoft.com/library/default.asp?url=/library/en-us/cdosys/html/ecdb51f4-5ba0-46d8-9c7c-7e4154a18f50.asp
下面這個 VBScript 範例所示範的是,如何使用 CDO,透過 SMTP 服務來傳遞訊息:
set msg = WScript.CreateObject("CDO.Message")
msg.From = "myname@mydomain.com"
msg.To = "someone@somedomain.com"
msg.Subject = "testing"
msg.TextBody = "This is a test message body."

msg.Configuration.Fields("http://schemas.microsoft.com/cdo/configuration/smtpserver") = "smtpserver.mydomain.com"

msg.Configuration.Fields("http://schemas.microsoft.com/cdo/configuration/sendusing") = 2

msg.Configuration.Fields.Update
msg.Send

這個程式碼範例在前五行建立了 CDO 物件,並指定訊息的基本資訊。
接下來的兩行則使用 CDO 組態物件來設定各種組態設定的欄位值。每一個欄位都由兩個部份所組成:名稱環境首碼 (如 "http://schemas.microsoft.com/cdo/configuration/") 以及本機名稱 (如 "smtpserver")。
這個機制是以 World Wide Web Consortium (W3C) XML 格式的名稱環境建議 (http://www.w3c.org/TR/REC-xml-names/) 為依據,主要是在其他相關版本的 CDO 元件之間提供一致性和相容性。
"smtpserver" 欄位可指定 SMTP 伺服器的網域名稱 (或 IP 位址),而 "sendusing" 欄位則定義是要使用本機 SMTP 服務放置目錄來傳送訊息,還是直接透過網路傳到 SMTP 伺服器。後者的值設為 2,意思是透過網路,將訊息傳到指定的 SMTP 伺服器。
程式碼的最後兩行則是更新組態設定,並啟動訊息的傳遞作業。
使用 CDO 元件來驗證 SMTP 服務是有點大材小用,不過,指令檔對於其他系統管理作業來說卻是相當有用。舉個例說,指令檔可以用在「效能記錄檔及警示」程式中,當某些系統計數器超過指定的臨界值時,即以電子郵件發出通知。
指出傳遞失敗
如果電子郵件訊息因故無法傳遞 (例如,使用者名稱或電子郵件地址不對),它會重新導向Badmail 目錄。根據預設值,Badmail 目錄的位置應該是在"root:\Inetpub\mailroot\Badmail"。請檢查被退回的電子郵件內容和錯誤訊息,儘可能更正錯誤,然後再透過剛剛所討論的其中一種傳遞方法,將訊息再重新傳送一次。
除了 Badmail 目錄之外,電子郵件訊息也可以放在 Queue 目錄下長達一段指定時間(您可以調整 [預設 SMTP 虛擬伺服器內容] 對話方塊的 [傳送] 標籤中的輸出 [重試間隔],來指定這個設定值)。如果因為網路忙線或當掉,而無法立即傳遞訊息,訊息就會儲存在這個 Queue 目錄下,每隔指定的間隔時間再加以傳送。如果 SMTP 在幾次失敗之後放棄傳遞,那麼訊息最後就會被送到 Badmail 目錄下。

自動轉址寫法

資料來源: http://blog.longwin.com.tw/archives/000071.html

自動轉址寫法

a,b 轉載自 : Openwebmail FAQ
a.
----------------------------------------
<html><head>
<meta http-equiv="Refresh"
content="0;URL=http://your_server/cgi-bin/openwebmail/openwebmail.pl">
</head></html>
----------------------------------------
b.
---------------------------------------
<html>
<body onload=
"window.open('http://your_server/cgi-bin/openwebmail/openwebmail.pl','_top')">
</body>
</html>
----------------------------------------
以下是其它寫法 (非Html)
----------------------------------------
c. PHP header 寫法
---------------------------------------
header("Location: https://fgps.tcc.edu.tw/cgi-bin/openwebmail/openwebmail.pl");
---------------------------------------
d. JavaScript 寫法
---------------------------------------
<script language="Javascript">
<!--
if (screen.width == "800")
{
location="fgps/800/index.php?link=index"
}
else
{
location="fgps/1024/index.php?link=index"
}
//-->
</script>
---------------------------------------
e. ASP
<%
Response.Redirect("要跳轉的網址")
%>

補充資料
資料來源:http://www.webconfs.com/how-to-redirect-a-webpage.php


301 Redirect

301 redirect is the most efficient and Search Engine Friendly method for webpage redirection. It's not that hard to implement and it should preserve your search engine rankings for that particular page. If you have to change file names or move pages around, it's the safest option. The code "301" is interpreted as "moved permanently".
You can Test your redirection with Search Engine Friendly Redirect Checker
Below are a Couple of methods to implement URL Redirection via code and htaccess redirect

IIS Redirect

  • In internet services manager, right click on the file or folder you wish to redirect
  • Select the radio titled "a redirection to a URL".
  • Enter the redirection page
  • Check "The exact url entered above" and the "A permanent redirection for this resource"
  • Click on 'Apply'

ColdFusion Redirect

<.cfheader statuscode="301" statustext="Moved permanently">
<.cfheader name="Location" value="http://www.new-url.com">


PHP Redirect

<?
Header( "HTTP/1.1 301 Moved Permanently" );
Header( "Location: http://www.new-url.com" );
?>


ASP Redirect

<%@ Language=VBScript %>
<%
Response.Status="301 Moved Permanently"
Response.AddHeader "Location","http://www.new-url.com/"
%>


ASP .NET Redirect

<script runat="server">
private void Page_Load(object sender, System.EventArgs e)
{
Response.Status = "301 Moved Permanently";
Response.AddHeader("Location","http://www.new-url.com");
}
</script>


JSP (Java) Redirect

<%
response.setStatus(301);
response.setHeader( "Location", "http://www.new-url.com/" );
response.setHeader( "Connection", "close" );
%>


CGI PERL Redirect

$q = new CGI;
print $q->redirect("http://www.new-url.com/");


Ruby on Rails Redirect

def old_action
headers["Status"] = "301 Moved Permanently"
redirect_to "http://www.new-url.com/"
end


Redirect Old domain to New domain using htaccess redirect

Create a .htaccess file with the below code, it will ensure that all your directories and pages of your old domain will get correctly redirected to your new domain.
The .htaccess file needs to be placed in the root directory of your old website (i.e the same directory where your index file is placed)
Options +FollowSymLinks
RewriteEngine on
RewriteRule (.*) http://www.newdomain.com/$1 [R=301,L]
Please REPLACE www.newdomain.com in the above code with your actual domain name.
In addition to the redirect I would suggest that you contact every backlinking site to modify their backlink to point to your new website.
Note* This .htaccess method of redirection works ONLY on Linux servers having the Apache Mod-Rewrite moduled enabled.

Redirect to www using htaccess redirect

Create a .htaccess file with the below code, it will ensure that all requests coming in to domain.com will get redirected to www.domain.com
The .htaccess file needs to be placed in the root directory of your old website (i.e the same directory where your index file is placed)
Options +FollowSymlinks
RewriteEngine on
rewritecond %{http_host} ^domain.com [nc]
rewriterule ^(.*)$ http://www.domain.com/$1 [r=301,nc]
Please REPLACE domain.com and www.newdomain.com with your actual domain name.
Note* This .htaccess method of redirection works ONLY on Linux servers having the Apache Mod-Rewrite moduled enabled.

How to Redirect HTML

Please refer to section titled 'How to Redirect with htaccess', if your site is hosted on a Linux Server and 'IIS Redirect', if your site is hosted on a Windows Server.

[Java Script]浮動圖層(Java Script篇)

文章發佈於Sevendesign,如需轉貼請保留本訊息,並註明原文連結
原文連結:http://sevendesign1230.pixnet.net/blog/post/2484891
 
浮動圖層(Floating Layer)的技術其實經常應用在許多較長的網頁文件中,藉以呈現能隨著瀏覽器的捲軸移動的浮動廣告或快速選單。有許多的方法都能達到此效果,在此提供利用JavaScript的方法來達到浮動圖層的效果,如需使用Css達到浮動圖層效果請點此

2010年11月28日 星期日

列印頁版面設定參考

印滿A4
輸出直式72dpi,596寬,842長


A4(上下個留2公分)
輸出直式72dpi,488寬,732長


計算方法:
可自行依dpi(Dots per inch 每英吋有幾個點)換算一下
像A4大約是210(mm)x 297(mm)
假設留邊3.17(cm)(Word版面設定預設值)
則可印寬度為 210 - (31.7 x 2) = 146.6(mm)
換算為英吋為 14.66(cm) / 2.54 = 5.77(inch)
而Word預設解晰度為96dpi
所以可算出Word中大約可放入5.77 x 96 = 554(px) 寬的資料
高的算法也一樣

Response.CodePage VS Session.CodePage

Response.CodePage
http://msdn.microsoft.com/en-us/library/ms524628.aspx

Session.CodePage
http://msdn.microsoft.com/en-us/library/ms525649.aspx

2010年11月24日 星期三

取得GUID@ASP

資料來源:http://leancoding.blogspot.com/2008/01/guidasp.html

GUID全名是Globally Unique Identifier,依據微軟的說法:GUID 是一個 128 位元的整數 (16 位元組),可以在需要唯一識別項時用於所有電腦和網路。
因為重複的機率很低,可以用來當做資料庫的key值,以避免以流水號當作key值時,可以修改網址參數而偷看到別人的資料。這支程式也是從網路上找到的,年代久遠出處已經不可考了。

Function GetGuid()
    Set TypeLib = Server.CreateObject("Scriptlet.TypeLib")
    tg = TypeLib.Guid  GetGuid = mid(tg, 2 ,len(tg)-4)
    Set TypeLib = Nothing
End Function

2010年11月22日 星期一

SERVER 2008存取檔案記錄的設定方式

資料來源:http://yateousz.blog.ithome.com.tw/post/3995/71878

A. 先啟動檔案及資料夾的稽核功能:
A1. 開始>系統管理工具>本機安全性原則
A2. 選: 本機原則>稽核原則
A3. 打開: 稽核物件存取
A4. 將: 成功/失敗 兩個都勾起來
A5. 確定

B. 設定哪些檔案及資料夾要被稽核:
B1. 在你想稽核的檔案或資料夾上按右鍵, 選: 內容
B2. 安全性>進階>稽核>編輯>新增
B3. 先輸入有哪些 User 或 Group 要在這裡被稽核
B4. 接下來會出現稽核項目, 請勾選你想要稽核的項目
B5. 確定

以後, 所有的存取紀錄, 都會存放在事件檢視器的安全項目裡, 直接打開來看就好了.

2010年11月18日 星期四

資料來源:How to Create a Scroll Bar using CSS

How to Create a Scroll Bar Using CSS

A frequently asked question is how to create a box with a scroll bar for displaying content. Okay, I'll tell you, but first I have to rant a bit. I just hate those little scrolling boxes. Now this is just my opinion and it's a gross over generalized one at that, but I believe that most people who want this functionality simply don't understand how web pages work. They design some lovely layout in an image editor with beautiful graphics on the left, right, top, and bottom. Everything is sliced to perfection. Now, when they start adding real content to the page, it starts pulling the graphics apart. You can read more about the exploding tables phenomenon in my rant about spans.
Since they don't understand how web pages work, they believe that, instead of fixing the page to properly display the content, they should limit the size of the content by creating a scroller. This just makes the site harder to use. Printing becomes a problem because only the visible portion of the scroller's content prints. In some browsers, the mouse wheel will not scroll the content properly. And the poor users wind up with multiple scroll bars if their browser window isn't large enough to display the full page, which just leads to a confusing interface. In almost all cases, this is simply bad web design.
Okay, I feel better now. <smile>
You can use CSS to create a scrollable box. Consider this source code:
<div style="width: 190px; height: 190px; overflow: auto; padding: 5px">
      content in here
   </div>
Here is what that would look like and try to imagine reading this article if the entire text were in that little box:
Lorem ipsum dolor sit amet, consectetuer adipiscing elit. Aliquam erat volutpat. Praesent tempus rutrum wisi. Proin dui libero, tempor non, mattis nec, imperdiet a, nulla. Nunc hendrerit, metus eget sodales interdum, ipsum felis lacinia elit, vel bibendum nunc ligula ac wisi. Donec vitae neque. Nam quis ante ut est viverra aliquet. Vestibulum dui. Phasellus ultricies elit nec nibh. Sed pede tortor, tincidunt a, vestibulum id, posuere quis, eros. Vestibulum quam. Nullam augue. Nullam eleifend turpis a augue. Aenean vestibulum. Quisque et velit eu diam consequat nonummy. Nullam volutpat enim et pede.
Fusce pretium. Sed sodales arcu eu nulla. Nunc dapibus dui nec tortor. Ut hendrerit dolor sit amet pede. Proin sit amet lorem. Vestibulum quis ligula. Quisque leo libero, pharetra at, porttitor at, mollis imperdiet, magna. Donec venenatis neque quis arcu. Cum sociis natoque penatibus et magnis dis parturient montes, nascetur ridiculus mus. Ut enim nibh, euismod et, gravida id, euismod et, lacus. Praesent consectetuer velit non neque. Nulla vehicula, arcu tincidunt vehicula ullamcorper, neque sapien iaculis ipsum, sit amet suscipit mi pede vitae augue. Cras tempor, arcu molestie porta pharetra, pede ipsum faucibus nisl, sit amet eleifend urna ante vel nibh. Cras egestas bibendum mauris. Etiam sit amet risus a magna sagittis faucibus.
In ante. Nunc aliquet tincidunt sem. Morbi vestibulum lectus eget tortor. Integer volutpat. Mauris vitae erat quis neque tempor faucibus. Duis mattis. Duis nec magna. Aliquam tristique mattis lorem. Morbi gravida. Nunc malesuada velit id enim. Nullam sit amet dolor eget orci dignissim imperdiet. Morbi viverra neque vitae magna. Sed nonummy. Sed nunc risus, dignissim consectetuer, hendrerit vel, dapibus at, risus. Mauris id neque sit amet augue pretium blandit. Sed sit amet nunc. Sed fermentum tristique nibh. Proin pellentesque tincidunt risus. Aenean erat. In blandit aliquam massa.
That's all there is to it. You can put this in the body of a page, or you can place it inside another container, like a table for example. If you have a good valid reason for using a scroller, use it. If all you're doing is protecting a flawed design, consider fixing the design.

CSS語法應用 - overflow控制捲軸

資料來源:木笛雅設
捲軸控制在網頁設計上算是滿常碰到的問題
尤其當div排版的方法逐漸成為主流時
善用overflow就能有效的的掌握各種捲軸效果

Column count doesn't match value count at row 問題修正

通常是insert的時候欄位數量不對(例如5個欄位卻插入了6欄資料)
檢查一下insert的語法即可.

2010年11月16日 星期二

(Google Analytics )如何追蹤 Flash 事件?

資料來源:如何追蹤 Flash 事件?

如何追蹤 Flash 事件?

請注意: 本文適用於最新版的追蹤程式碼。 如果您使用的是舊版,請參閱下列文章

若要判斷您使用的是哪個版本的追蹤程式碼,請參閱我使用的是哪一個版本的追蹤程式碼?
Google Analytics (分析) 可讓您追蹤所有以瀏覽器為基礎的事件,包括 Flash 和 JavaScript 事件在內。您可以使用 _trackPageview 函數為所有 Flash 動作指派網頁檔名,並在適當的目標或程序步驟中輸入該檔名。 重要: 請注意,您的 Analytics (分析) 追蹤程式碼以及對 _gat._getTracker 的呼叫都必須放在網頁中對 _trackPageview. 的呼叫的上方。
<script type="text/javascript">
var gaJsHost = (("https:" == document.location.protocol) ? "https://ssl/." : "http://www./");
document.write(unescape("%3Cscript src='" + gaJsHost + "google-analytics.com/ga.js' type='text/javascript'%3E%3C/script%3E"));
</script>
<script type="text/javascript">
var pageTracker = _gat._getTracker("UA-xxxxxx-x");
pageTracker._trackPageview();
</script>
若要追蹤事件,請使用指定該事件名稱的引數來呼叫 _trackPageview() 。 例如,呼叫:
pageTracker._trackPageview("/purchase_funnel/page1.html");
會將每個 Flash 呼叫事件的產生記錄下來,做為 /purchase_funnel/page1.html 名稱之下的網頁檢視。 引數的開頭必須是斜線,同時必須放在引號內。事件名稱可以組織成任何您想要的目錄樣式結構。 _trackPageview 的路徑 / 檔名引數不需代表您網站上的實際網址。
Flash 程式碼範例
on (release) {
// Track with no action
getURL("javascript:pageTracker._trackPageview('/folder/file.html');");
}

on (release) {
//Track with action
getURL("javascript:pageTracker._trackPageview('/folder/file.html');");
_root.gotoAndPlay(3);
myVar = "Flash Track Test";
}

onClipEvent (enterFrame) {
getURL("javascript:pageTracker._trackPageview('/folder/file.html');");
}
若要驗證對 _trackPageview 的呼叫是否正確,可以在執行已更新追蹤程式碼的 24-48 小時後檢查您的 [主要內容] 報告。 您應該可以在報告中看到指定的網頁名稱。

(Google Analytics )如何為 Flash 網頁設定目標和程序?

資料來源:如何為 Flash 網頁設定目標和程序?


請注意: 本文適用於最新版的追蹤程式碼。 若您使用舊版本,請參閱下列文章

若要判斷您使用的是哪個版本的追蹤程式碼,請參閱我使用的是哪一個版本的追蹤程式碼?

您可以追蹤您的網站上所有以瀏覽器為基礎的事件,包含 Flash 事件。 使用 _trackPageview 函數,您可以指派網頁檔名到 Flash 動作,並將該檔名輸入到適當的目標或程序步驟中。 重要: 請注意,您的 Analytics (分析) 追蹤程式碼以及對 _gat._getTracker 的呼叫都必須放在網頁中對 _trackPageview 的呼叫的上方。
<script type="text/javascript">
var gaJsHost = (("https:" == document.location.protocol) ? "https://ssl/." : "http://www./");
document.write(unescape("%3Cscript src='" + gaJsHost + "google-analytics.com/ga.js' type='text/javascript'%3E%3C/script%3E"));
</script>
<script type="text/javascript">
var pageTracker = _gat._getTracker("UA-xxxxxx-x");
pageTracker._trackPageview();
</script>
若要追蹤事件,請使用指定該事件名稱的引數來呼叫 _trackPageview()。 例如,呼叫:


pageTracker._trackPageview("/purchase_funnel/page1.html");

會將每個 Flash 呼叫事件的產生記錄下來,做為「/purchase_funnel/page1.html」名稱之下的網頁檢視。 引數的開頭必須是斜線,同時必須放在引號內。
事件名稱可以組織成任何您想要的目錄樣式結構。 做為
_trackPageview 的路徑 / 檔名引數不需代表您網站上的實際網址。
Flash 程式碼範例

on (release) { // Track with no action getURL("javascript:pageTracker._trackPageview('/folder/file.html');"); }
on (release) { //Track with action getURL("javascript:pageTracker._trackPageview('/folder/file.html');"); _root.gotoAndPlay(3); myVar = "Flash Track Test"; }
onClipEvent (enterFrame) { getURL("javascript:pageTracker._trackPageview('/folder/file.html');"); }

2010年11月14日 星期日

解決 PHP 與 MySQL 5 的亂碼問題

mysql_query('SET NAMES utf8');
mysql_query('SET CHARACTER_SET_CLIENT=utf8');
mysql_query('SET CHARACTER_SET_RESULTS=utf8');
只要在 PHP 程式碼中用 mysql_query() 對資料庫建立查詢之前,加入下面這幾行來指定語系就可以了。

2010年11月12日 星期五

使用Google Analytics追蹤多個網域

資料來源:使用Google Analytics追蹤多個網域

追蹤多個網域

請注意:本文適用於舊版的追蹤程式碼。建議您更新追蹤程式碼來使用最新 (非同步) 版本,相關使用說明請參閱這篇文章
本文說明如何跨完全不同的網域 (例如 www.example.com 和 www.mysite.com) 進行追蹤。如果要跨子網域 (例如 store.example.com 和 checkout.example.com) 追蹤,則請您閱讀這篇文章
如果您的網站使用多個網域,只要稍微修改追蹤程式碼,還是可以追蹤訪客。方法如下:
1. 請將以下這段程式碼 (以粗體標示) 同時加入兩個網域上所有網頁的追蹤程式碼中
<script type="text/javascript">
var gaJsHost = (("https:" == document.location.protocol) ? "https://ssl." : "http://www.");
document.write(unescape("%3Cscript src='" + gaJsHost + "google-analytics.com/ga.js' type='text/javascript'%3E%3C/script%3E"));
</script>
<script type="text/javascript">
try{
var pageTracker = _gat._getTracker("UA-12345-1");
pageTracker._setDomainName("none");
pageTracker._setAllowLinker(true);

pageTracker._trackPageview();
} catch(err) {}
</script>

2. 接下來,您必須在網域之間的所有連結中加入 _link 函數。請注意,Google Analytics (分析) 追蹤程式碼以及對 _gat._getTracker (如步驟 1 所示) 的呼叫都必須放在網頁中對 _link 的呼叫之前。假設您目前的連結為:

<a href="https://www.secondsite.com/?login=parameters"> 立即登入</a>
請更改為:
<a href="https://www.secondsite.com/?login=parameters" onclick="pageTracker._link(this.href); return false;">立即登入</a>
3. 如果您使用表單在網域之間傳送資訊,則必須使用 _linkByPost 函數,而且 Google Analytics (分析) 追蹤程式碼以及對 _gat._getTracker (如步驟 1 所示) 的呼叫都必須放在網頁中對 _linkByPost 的呼叫之前。
<form action="http://newdomain.com/form.cgi" onSubmit="javascript:pageTracker._linkByPost(this)">
這個方法也適用於 method="GET" 的表單
4. 根據預設,報表中的資料只會包含「要求 URI」,不含網域名稱。如果您希望在報表中看到網域名稱,可以透過下列設定替設定檔建立「進階」篩選器:
篩選器類型:自訂篩選器 > 進階
欄位 A:主機名稱解壓縮 A : (.*)
欄位 B:要求 URI
解壓縮 B:(.*)
輸出至:要求 URI
建構函式:$A1$B1
請注意:執行此篩選器後,您的內容報表便會立即修改。建議您在採用現有追蹤程式碼的新設定檔中執行此篩選器。篩選器和目標

Facebook開發破圖問題處理方式

加上
<style>
img {
    display:block;
}
</style>

[PHP] cache禁止瀏覽器快取網頁 No Cache

資料來源:http://dorothycode.blogspot.com/2010/10/php-cache-no-cache.html

[PHP] cache禁止瀏覽器快取網頁 No Cache
避免proxy或bowser cache住你的網頁。(如此的話使用者看到的都會是舊的畫面)

HTML Meta Tag:
<meta http-equiv="cache-control" content="no-cache">
<meta http-equiv="pragma" content="no-cache"> 舊式寫法,加是為了相容性。
<meta http-equiv="expires" content="0"> 將網頁設做立即過期。
In PHP:
<?php
// Expires in the past
header("Expires: Mon, 26 Jul 1990 05:00:00 GMT");
// Always modified
header("Last-Modified: ".gmdate("D, d M Y H:i:s")." GMT");
// HTTP/1.1
header("Cache-Control: no-store, no-cache, must-revalidate");
header("Cache-Control: post-check=0, pre-check=0", false);
// HTTP/1.0
header("Pragma: no-cache");
?>

2010年11月11日 星期四

MySQL安裝完成後服務無法啟動的解決方法

文章來源:MySQL Forums :: InnoDB :: Plugin 'InnoDB' init function returned error.
For Windows OS:

OK, I struggled with this for ages. There are various partial fixes that did not fix it for me on the web, but in the end the following worked:

If you've installed it, then uninstall (an earlier version that had been removed could have left crap that is causing an issue, so best to start off clean). Do this as follows:
- Add/Remove Programs and remove MySQL.
- Delete the Programs File/MySQL folder (it gets left behind)
- Delete the data file (where ever you stored it) #:\MySQL DataFiles > This is assuming you have no data to as yet to worry about!!!!
- Run RegEdit and delete all the MySQL Keys (search and F3) and the half a dozen or so CLSIDs that coe up with just a single non-defailt key for MySQL. You can leave ADOBE\ keys that mention it if you have dreamweaver etc. As allways back up you registry first before choppig it!

OK. Now run te install and go through the config wizard until it fails at the start up. Then close it.

Now open up Services and open MySQL properties - I set it to run under the Administrator account rather than System/ANOther to ensure it had permissions.

Next, go to your new MySQL DataFile and delete 'ibdata1'.
Then go to 'C:\Documents and Settings\All Users\Application Data\MySQL\MySQL Server 5.1\data' and delete all tje 'ib_logfile' prefixed files (should be 0 and 1) - useful to notice the .err log here to which is a text file.

Then go back to Services and manually start it and all should be fine.

Hopefully I have saved you a few hourse peeing around with Windows - MySQL Devs, about time this bug was fixed eh? Been hanging around a long while now and the web is chok full of unanswered or half answered requests for help. Remember - some of us have no choice but to use Windows.

2010年11月10日 星期三

邊做邊學 PHP on Windows:在 IIS7 上執行 PHP

以下內文轉載於:Microsoft MSDN 
邊做邊學 PHP on Windows:在 IIS7 上執行 PHP

如何使用 CDO 物件來寄 E-Mail

以下內容轉載自強力鎯頭 の VB 部落
如何使用 CDO 物件來寄 E-Mail

CDO ( Collaboration Data Objects ) 物件 對應檔案 CDOSYS.dll E-Mail 寄送使用;
可應用於 VB ASP .Net 是簡單的信件寄送方式之一

    Dim objCDO As Object
    Dim strCfg As String

    Set objCDO = CreateObject("CDO.Message")
    strCfg = "http://schemas.microsoft.com/cdo/configuration/"

    With objCDO
       
        .Sender = "別胡亂送@OhMyGod.com"
        .From = "誰是寄件者@NoOneKnows.com"
        .To = "要寄給誰@whois.com.tw"

        .Fields("urn:schemas:mailheader:X-Priority") = 1 ' Priority = PriorityUrgent 高優先順序
        .Fields("urn:schemas:mailheader:return-receipt-to") = "誰是寄件者@NoOneKnows.com" ' 要求讀取回條
         ' .Fields("urn:schemas:httpmail:importance") = 2 ' Importance = High
       ' .Fields("urn:schemas:httpmail:priority") = 1 ' Priority = PriorityUrgent
        .Fields.Update ' 更新欄位
       
        .Subject = "沒有主旨(放主題啦)"
       
        .TextBody = "ORZ" ' Text 文字格式信件內容
        ' HTML 網頁格式信件內容
        .HTMLBody = "<HTML>" & _
                                "<BODY>" & _
                                "<table border=""1"" width=""100%"">" & _
                                "<tr><td>I</td><td>am</td><td>Hammer</td><td>!</td></tr>" & _
                                "<tr><td>Who</td><td>r</td><td>u</td><td>?</td></tr>" & _
                                "</table>" & _
                                "</BODY>" & _
                                "</HTML>"
                               
        .AddAttachment "C:\AttFile.zip" ' 附加檔案
       
        .CC = "Xman@yahoo.com.tw"   ' 副本
        .BCC = "SpiderMan@hotmail.com.tw" ' 密件副本
       
        .Configuration(strCfg & "sendusing") = 2 ' Sendusing = SendUsingPort
        .Configuration(strCfg & "smtpserver") = "msa.hinet.net" ' SMTP Server
       ' .Configuration(strCfg & "smtpserverport") = 25 ' SMTP Server Port ( 預設即為 25 )

        ' SMTP Server 如需登錄 , 則需設定 UserName / Password
        ' .Configuration(strCfg & "sendusername") = "UserName" ' Send User Name
        ' .Configuration(strCfg & "sendpassword") = "Password" ' Send Password
       
        .Configuration.Fields.Update ' 更新 (欄位) 組態
       
       ' .DSNOptions = 4 ' 回傳信件傳送狀態
       '  cdoDSNDefault = 0 , DSN commands are issued.
       '  cdoDSNDelay = 8 , Return a DSN if delivery is delayed.
       '  cdoDSNFailure = 2 , Return a DSN if delivery fails.
       '  cdoDSNNever = 1 , No DSNs are issued.
       '  cdoDSNSuccess = 4 , Return a DSN if delivery succeeds.
       '  cdoDSNSuccessFailOrDelay = 14 ,Return a DSN if delivery succeeds, fails, or is delayed.

        .Send ' 傳送
       
    End With
   
    Set objCDO = Nothing


以上內容轉載自強力鎯頭 の VB 部落
其他參考資料:http://www.pro-soho.com/blog/article.asp?id=295


CDO 郵件元件使用方法
Microsoft從Windows Server 2000 及 Windows XP開始內建郵件元件已改為CDO
在之前的系統內建郵件元件則是 CDONTS,各位要注意,以下是CDO的用法

屬性 說明
Subject 郵件的主旨
From 寄件人的電子郵件信箱
To   收件人的電子郵件,可用分號;或逗號,斷開成多位收件人
CC   副本收件人的電子郵件,可用分號;或逗號,斷開成多位收件人
BCC 密送副本收件人的電子郵件,可用分號;或逗號,斷開成多位收件人
TextBody 郵件的本文-純文字模式
HTMLBody 郵件的本文-HTML模式